|
|||||||||||||
Japanese Garden Design ProjectGarden Project Stage 4 - Selecting Landscape Plants
I went to a local nursery to get a
good selection of quality plants for the garden. When selecting
plants, you pay a little more but get much better quality and
selection from a nursery as opposed to a hardware store. The nursery
personnel also offers expert advice on plants and landscape
projects. I tend to buy my specialty plants like azaleas and
camellias at the nursery and some filler plants like star
I
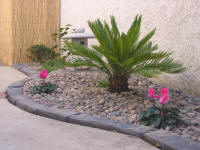
purchased approximately $73.00 worth of plants. I got a camellia, 2
azaleas and 2 fescue. These are all one gallon plants due to the
small size of u garden space. I also purchased a 3 gallon sago palm.
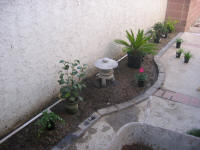
It is important
to place the plants, still in the containers where you think they
will go in the garden. Move them around until you are sure you have
them were you want them. You can them begin digging and planting.
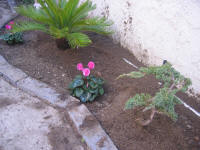
For the camellia and azaleas, I amended the soil with peat moss, for
good drainage. For the others, I used an all purpose soil amendment.
Dig a hold deeper and wider than the root ball, so you can place
amended soil around it. Make sure you plat the root ball at ground
level or a little above. Water the newly planted soil, and let it
settle. Place more soil around it and create a shallow water basin
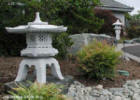
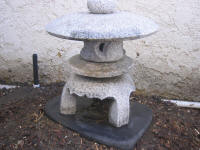
with dirt. Sprinkle water on it to harden it and keep it in place. I also purchased a small granite Japanese lantern. I crated a mound of dirt and sprinkled water on it to settle the soil. I placed a grey flat stone on top of the mound of dirt for the lantern to sit on.
I installed a drip irrigation
sprinkler system. It is important to run a sprinkler
hose to each
plant. Do this before you place your mulch or rock ground covering.
That way, your mulch will cover the sprinkler hoses. After I
planted all the plants and placed sprinklers in place, I covered the
dirt with medium sized river rock. The rock will act as a
I still want to add a trickling water feature to give the garden some natural sounds. I was unable to find one which has a battery operated pump, since I do not have electricity at the garden location, but will keep searching. There is also furniture to be added. I would like to get a stone bench, but want something more comfortable. I will shop for a wooden garden bench which has a padded seat. For now, I will utilize my teak wood chairs and table. I will also add small wood and bamboo gates to the entrances to the garden. Overall, I am very pleased with the results of my garden project. The cost was reasonable and it took me approximately 3 days from start to finish. This new Japanese Garden Retreat will be a good addition to my home and backyard. Proceed to Japanese Garden Retreat - Before and After Pictures >> |
|||||||||||||
 jasmine
and fescue at the hardware store garden center. I also but my
amendments and soil conditioner at the garden center because it is
less expensive.
jasmine
and fescue at the hardware store garden center. I also but my
amendments and soil conditioner at the garden center because it is
less expensive.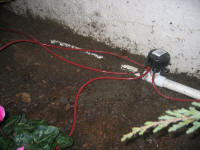
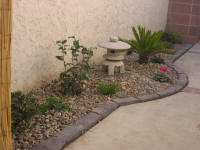 mulch,
keeping the weeds down and also add a nice structure to the Japanese
garden retreat.
mulch,
keeping the weeds down and also add a nice structure to the Japanese
garden retreat.
Japanese Garden Design Step 1 - Clean up • Step 2 - Bamboo Fence • Step 3 - Brick Planter • Step 4 - Selecting Plants • Japanese Garden Before and After